First of all, I had a problem with the way my heated-bed power-supply was connected, as the circuit was fixed with solder, that meant that the adapter block was physically connected to my reprap by its cable, and that I couldn't easily change it for another power supply.
My solution to the problem of wanting to quickly connect/disconnect a DC power supply was to take some bits of electrical screw-terminal:
 |
| sometimes referred to as a 'chocolate block' connector, cheap in long blocks |
 |
| It looks worse than it is. Wait, no it doesn't. |
The reason that connector is such a mess is that I got a cheapo fixed-12V power supply to connect directly to my mendel's motherboard, and now I have the two variable-voltage laptop power supplies from mendel-parts connected up in series. I was a little worried at first whether the combined current might blow one or both of them, but it seems to be working fine with both of them working at over half capacity.
This was necessary because the load heating my bed is resistive, therefore the power is directly determined by how high I can get the voltage going through it, and since the wiring to those resistors is soldered in place while the resistors are in heatsinks bolted to the bed, it would be no easy task to change them just to change between plastics, so I'm going with this.
Since then, I managed to get my first full set of prusa parts ready to send to someone at a low price, on account of a couple of the parts being slightly dodgy, but still functional. The ugliest print failures I'm thinking now I'll use in something that I'm going to build myself, such as sticking 2/3 printed vertices in the base of my rotary hydroponics design, at least until I find something better to do with the plastic than entrust it to a city council that has the worst track record for recyling in scotland:
 |
| Under capitalist logic, they figured the biggest population centre is the most difficult place to recycle, so they gave it the least funding to do so... |
So I adapted the tool that the guy in the video shows at 3m40s to be 3D-printable, and you can find the design here.
Well, sturdy drinking glasses from the bottom of wine bottles is nice, and the guy mentioned some uses for a cylinder from halfway up that I've already forgotten, but we're left with the neck seemingly as waste. So, inspired by my new favourite engineer I figured out a way that we could use those ends, and extend on the capabilities of reprap by using more materials. This is my first idea for a direct-drive paste extruder:
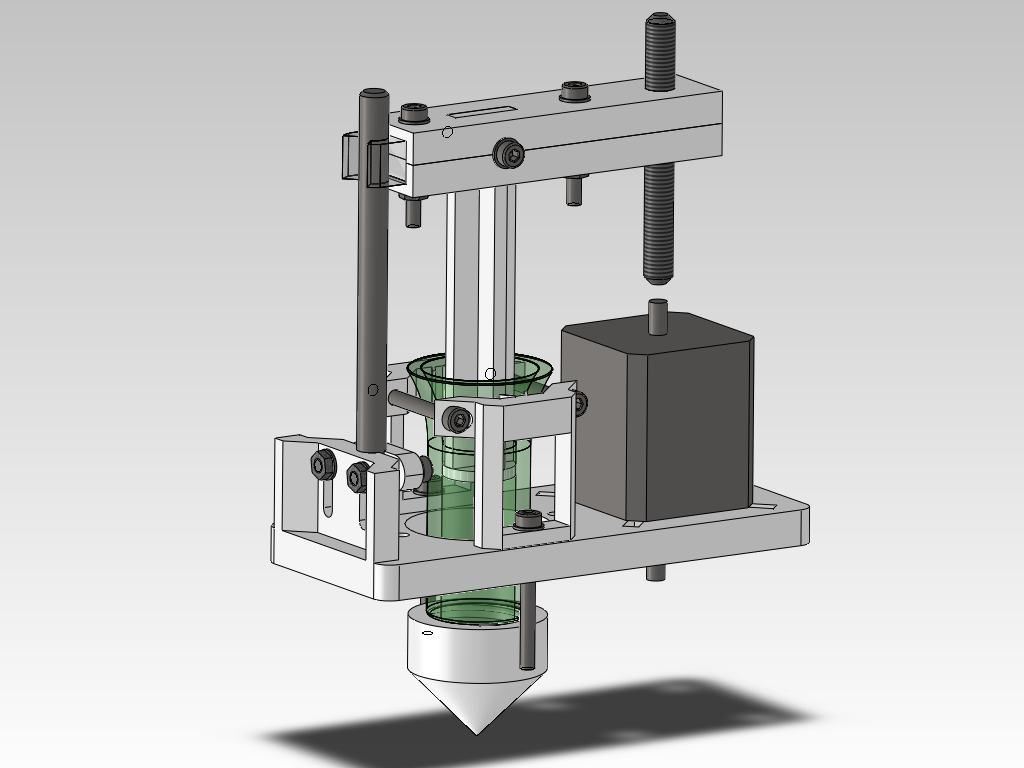 |
| First conceptual design (unfinished). |
This is by no means a new idea though, since makerbot industries already sell their own laser-cut kit for it, which isn't the brightest idea I've ever heard, because they are trying to push things that have non-linear viscosity using pressurised air, when there was already enough trouble controlling ooze problems with melting plastic.
Also, a few concepts are fleetingly described on the reprap wiki here, including a clay extruder for the Rapman printer which looks promising, but has no significant documentation going for it. Personally I'd rather start with the design up where everyone can see it and wait for me to epically win/fail with it, so that at least if I die in a freak blogging accident or happen to spot a squirrel, someone else can learn from my efforts and finish th

No comments:
Post a Comment