Having watched several hours of a wide variety of instructional videos and documentaries on various aspects of permaculture that can be found in many places online such as youtube, plus starting to read the first few chapters of Bill Mollison's brilliant "Permaculture: A Designer's Manual", I had enough grasp of the basics to start hashing out my first ideas and designs, and learn more as I go along by testing. My approach could be seen as 'jumping in the deep end', and while I would like to spend more time learning before acting, possibly even take a course on the subject, a constraint of time means that if I don't start implementing at least a few changes to this land immediately, then I'd miss the important winter period when trees can be easily moved bare-rooted and planted, while a constraint of money means that I wouldn't be able to afford attendance fees at most courses anyway.
Nonetheless, I agree somewhat with Mollison's thoughts in his manual that "Starting with a nucleus and expanding outwards is the most successful, morale-building and easily-achieved way to proceed." Where he and many others have advised that you can learn much by simply sitting back and observing nature, then testing any hypothesis of its workings, I hope that I can use nature as my university, as the ones with walls don't seem very conducive to learning.
 |
| First area of interest fenced off in the centre of this picture, see all that overgrown grass? Guess which way the prevailing wind is from... |
This land used to be covered in forests for the last few thousand years until the increasing thoughtless high-energy industrialisation in the cultural detritus of the roman empire led to them being cleared for timber, fuel and to dedicate most of the land to sheep herding.
While it is clearly possible to have lively forest growing here, the afforestation that occurred after the last ice age would have taken a long time to move up through the land, as the current barren landscape can make it difficult for many plants to grow in the cold and strong winds, a bit of thoughtful help is needed to improve on nature's ability to colonise and stabilise harsh environments. Such brilliant examples of permaculture in action as the Greening the Desert project show what difference a bit of thought can make to nature's ability to increase the fertility of a region.
One good tool of planning, besides listing and considering the interactions of components (takes a long time to write down, not going to stick that in here) and the ever-important observation, is to create a map.
 |
| Partial elevation map of the patch and surrounding area; perimeter traced from satellite images and details added from direct observation. |
Once I had some intentions set down, was able to access the land to see the lay of it, and began to gather some information about what types of plants grow well in this specific cold-temperate climate and how they affect each other, I was able to start sketching up a map of the area of operation, what was currently there in terms of topography (landscape) and outside energies (wind and sun). Since exact contour lines are very difficult to judge in a shallow-sloped sea of grass, I invented little V-shapes for my diagrams to mark slopes (points uphill, larger ones indicate a steeper slope), a bit like embankment marks on ordnance survey maps... except backwards.
 |
| Don't mind the scribbles on the left from uni, I like to re-use notebook pages. |
Using what I knew about the ground elevation, and after finding out what trees were available, I took another step in development of the design by laying out the trees in order of height and hardiness, and by designing in one of the most important elements to take control of when establishing a food forest, the collection/infiltration/runoff of rainwater.
Once I had a workable plan, and we got hold of some potted native trees from a fairly local tree nursery in Scourie, while waiting for bare-root fruit trees to be posted in from elsewhere in the UK we planted those pioneer trees while there was good weather, to let their roots establish for a bit so that they should make effective wind-breaks into spring.
 |
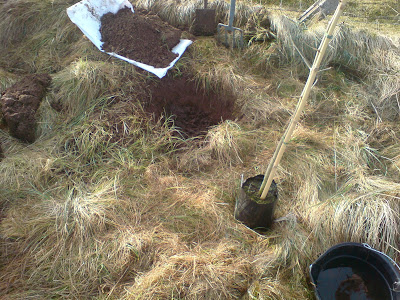
| Things needed for tree planting. |
- First we raked back some of the grass on a patch where we wanted to plant one, to make digging easier and to give some mulching material to lay down afterwards.
- Next we cut out blocks of sod with a fork and spade and laid them down to one side, taking care to gently pick out any loose earthworms that might otherwise get chopped up in the process.
- After scraping out lower soil to an appropriate depth, checked by dropping the tree in, we dropped a small amount of old manure into the bottom of the hole, so that beneficial bacteria and fungus could aid in each tree's growth.
- We removed the thin pot and dropped the tree into the hole, then packed the sod back in around it upside-down where it would fit, so that any grass left would decay at the bottom and become earthworm food.
 |
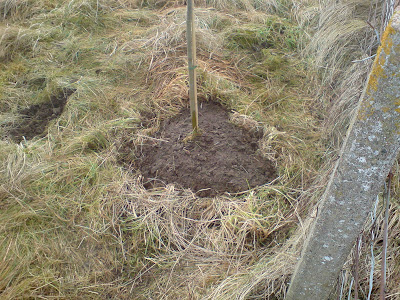
| Option 1: Cover loose soil with cuttings on top to smother weeds. |
 |
| Option 2: Loose soil on top to keep cuttings in place as they break down. |
- The pile was covered at the end with the leftover loose soil and grass cuttings, then watered.
- On a couple of trees we put the cuttings on after the soil, and on another we did it the other way around. I suspect the cuttings may blow away in the wind, and/or the compost-on-top version of this might get weeds trying to grow in it sooner, but I will wait and see the results.
- A sort-of-final and important step to this process will be planting some nitrogen-fixing legumes in and around the site that we planted the tree, to out-compete the grasses for light, which would otherwise compete for nutrients in part of the trees' root zone.
- A couple of the edible companion plants that I read are supposed to benefit tree establishment/growth, which should grow well in this area, are the artichoke (a type of thistle), and nasturtiums. I don't yet know which, if any, native trees function as legumes (though I know acacia serves that function, it is native to the southern hemisphere and not easy to get hold of here), so I may have to find that out by future observations of which trees do well next to others.
The next job that we took care of was to survey the ground for a water feature on contour. When digging a water-harvesting swale, it is a good idea to peg out a contour line on the hillside where you would like to dig it in. Normally you might use a surveyor's Dumpy Level, or a Laser Level to find points on the ground at the same elevation as a starting point, but such equipment is expensive for us to get hold of, so we developed a cheap-and-easy method that does a good job on such a small-scale project:
The materials you need are as many pegs as want to clearly show the curve of your contour, two poles that can either be stuck in the ground or stood on it in a way such that they reliably have their base at the same height (on or under the ground) with repeated movements, some string and a spirit level.
For the two poles, we used a couple of electric-fence posts that each have a spike on the bottom for driving into the ground, with a little foothold jutting out sideways at the top of that spike, making it easy to shove them in the same distance (so long as rocks don't get in the way, as they frequently did).
The method is pretty simple, but would probably be quite difficult to do on your own, unless you grow some extra arms to hold all the gear or find some kind of pole that stands upright steadily on its own:
- Put your poles side-by-side, bases at the same height, and tie each end of your string tightly at the same height on each pole, such that it won't slip up or down with a bit of tugging about
- We used just over a meter of string to prevent it sagging too much, but if it's too short then you can introduce significant errors from the larger number of measurements.
- Place one of the poles on your starting point, preferrably with someone there to hold it, to make sure it stays as upright as possible with some tension on the string.
- Move the second pole around the first in the general direction you think is level, put it down with the string pulled taut, and lay the spirit level on top of the string to check whether you are too high or low.
- Adjust the second pole's position if necessary.
- Remove the previously stationary pole and shove or hammer a peg into its position.
- We had a mix of scrap bamboo sticks and electric fence posts, so we alternated them to make the contour stand out with the bright-blue plastic posts.
- The pole that was moving is now the stationary pole, so pivot the other one around it to find another point on your contour.
- Repeat until you run out of pegs.
Given how rocky the soil here is, we probably won't be able to dig a pond for a permanent water store unless we can bring in some clay or concrete to seal the bottom of it.
The next jobs will be to dig in the swale, plant the fruit trees and plant some legumes as the weather warms up. I may have arrived here too late to plant a cover crop before planting the trees, but I'll still give it a go and see how they fare with an early spring planting. My next post might go back to something more mechanical depending how much work I do on each area.


No comments:
Post a Comment